
PILEMEDIC® SYSTEM
PileMedic® Bottom Seal: Keep the Grout in the Jacket
Before a PileMedic® jacket is filled, the bottom of the annular space has to be sealed so the grout stays in place. Where the repair reaches the seabed, the jacket is embedded in the soil. Where it stops above the seabed, a skirt, a ShearFlange™ or a friction clamp holds the seal.
- Seal at the mud line or anywhere along the pile
- Reusable ShearFlange™ for round piles
- Grout plug first to prevent blowout

TWO CONDITIONS
Where Does the Repair Stop?
In a submerged pile repair, a PileMedic® jacket forms a shell around the damaged pile, and the space between them is filled with concrete or grout. The bottom of that annular space has to be closed first, or the grout runs out.
There are two cases. Either the repair and the jacket extend down to the seabed, or the repair covers only part of the pile, such as the splash zone, and the seal has to be made at some point along the pile height. Each case has its own methods, covered below.
- Repair reaches the seabed: embed the jacket in the soil
- Repair stops above the seabed: skirt and skirt pins, ShearFlange™ or friction clamp

OPTION 1
Sealing at the Mud Line
When the repair goes all the way to the seabed, the bottom of the jacket is pushed into the soil. That soil is usually soft and silty and moves easily with a high-pressure water jet. Most designs call for 6 to 12 in. of embedment. Soon after the jacket is placed, the natural movement of the seabed fills in around it.
Whatever the seal, place a short layer of grout first: 6 to 12 in. (150 to 300 mm) at the bottom of the annular space. Let it harden for several hours. It then acts as a plug that prevents blowout, so the weight of the remaining grout cannot push the soft soil out of the way. Then fill the rest of the jacket.
- Jet the soil, then set the jacket 6 to 12 in. deep
- Place a 6 to 12 in. grout plug and let it set
- Fill the remaining height several hours later

OPTION 2
Sealing Along the Pile Height: Skirt and Skirt Pins
PileMedic® Skirt Pins and a pleated plastic skirt form a bag at the bottom of the jacket that holds the grout. The installation guide lists 8 pins for square piles and one per 2 in. of diameter for round piles (4 to 12 for 8 to 24 in.). [Confirm with QuakeWrap the minimum: https://pilemedic.com/bottom-seal/ still says 6 or more pins, more than the guide's 4 for an 8 in. round pile.]
-
Band the pins
Thread the skirt pins onto a zip tie or plastic band. On square piles, pins in slot 1 go at the corners and pins in slot 2 at the center of each face.
-
Fasten the skirt
Wrap the heavy-duty plastic skirt around the pile and band its pleated edge tight to the pile. The other edge hangs loose.
-
Set the jacket
Place the PileMedic® jacket so it rests on the skirt pins.
-
Stuff the foam
Push foam into the bottom of the annular space around the entire perimeter.
-
Fold and tie
Fold the skirt up over the jacket and band it tight. The result is a bag that holds the grout.
CHOOSE A SEAL
Bottom Seal Options at a Glance
| Option | When to use it | How it works | Supplied by |
|---|---|---|---|
| Seabed embedment | Repair reaches the seabed | Jacket jetted 6 to 12 in. into the soil, then a grout plug | No extra parts |
| Skirt and skirt pins | Seal at any elevation | Banded pins pinch a plastic skirt to the pile, foam fills the gap, skirt folds over the jacket | PileMedic® kit |
| ShearFlange™ | Round piles, seal at any elevation | Two half rings with a wide platform, slid into place and bolted; the jacket rests on top | QuakeWrap; removed and reused after the grout hardens |
| Friction clamp | Seal at any elevation | Threaded rods and nuts clamp to the pile; plywood cut to the pile shape forms a platform; foam stops leaks | Made locally |
Not sure which seal fits your site?
Tell us the pile type, repair height and water depth. Our team will recommend the right PileMedic® setup and provide specifications for your engineer.
REUSABLE AND LOCAL OPTIONS
ShearFlange™ and Friction Clamp
-
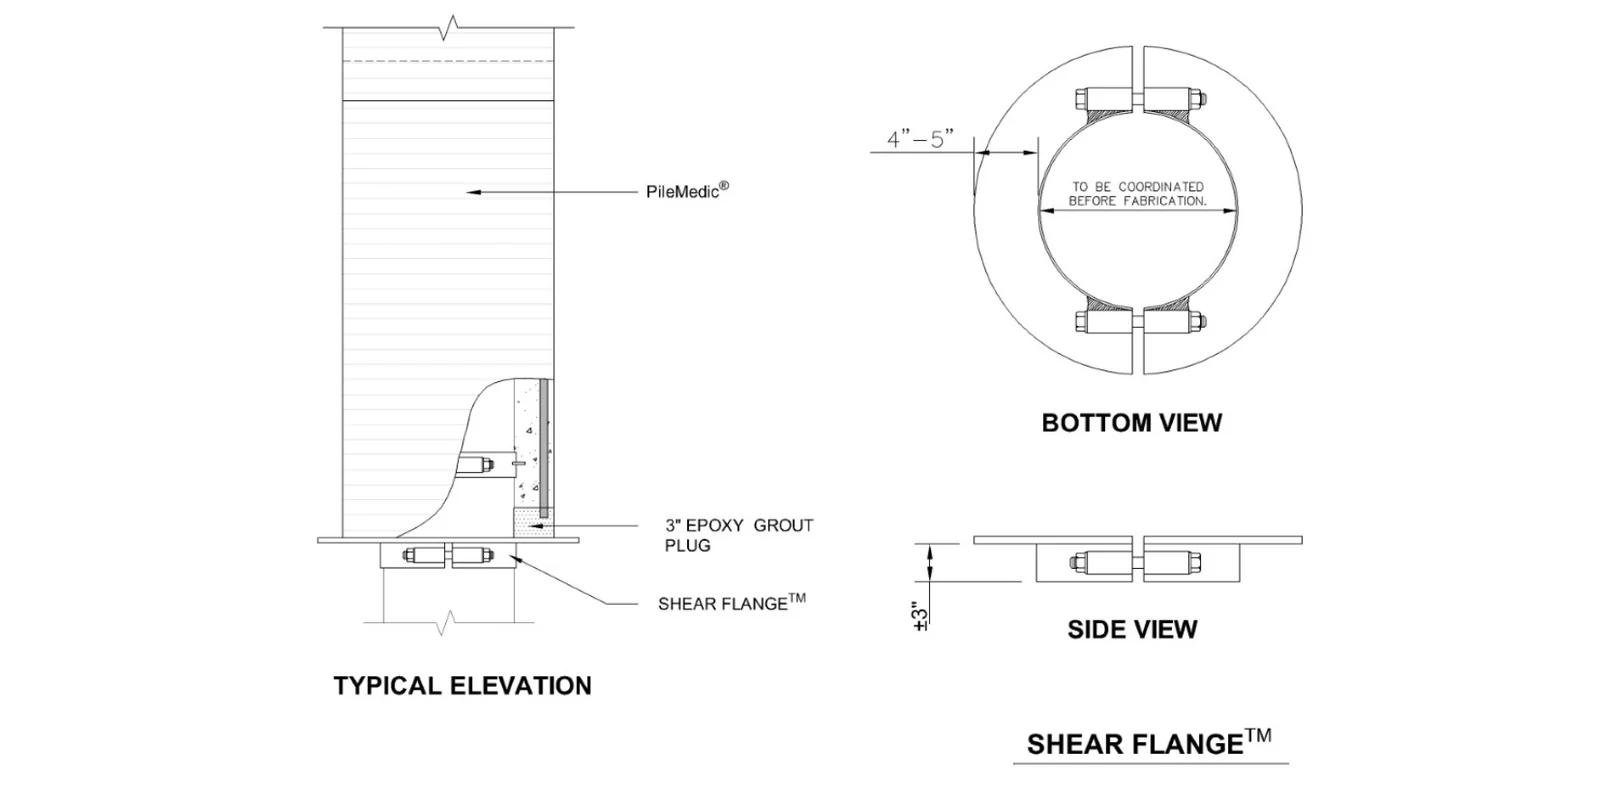
ShearFlange™
Two half rings go around the pile with the bolts loose, so the ring slides to the right elevation. Divers tighten the bolts, the jacket rests on the platform, and once the grout hardens the ShearFlange™ comes off for the next pile.
ShearWrap™ & ShearClamp™ -
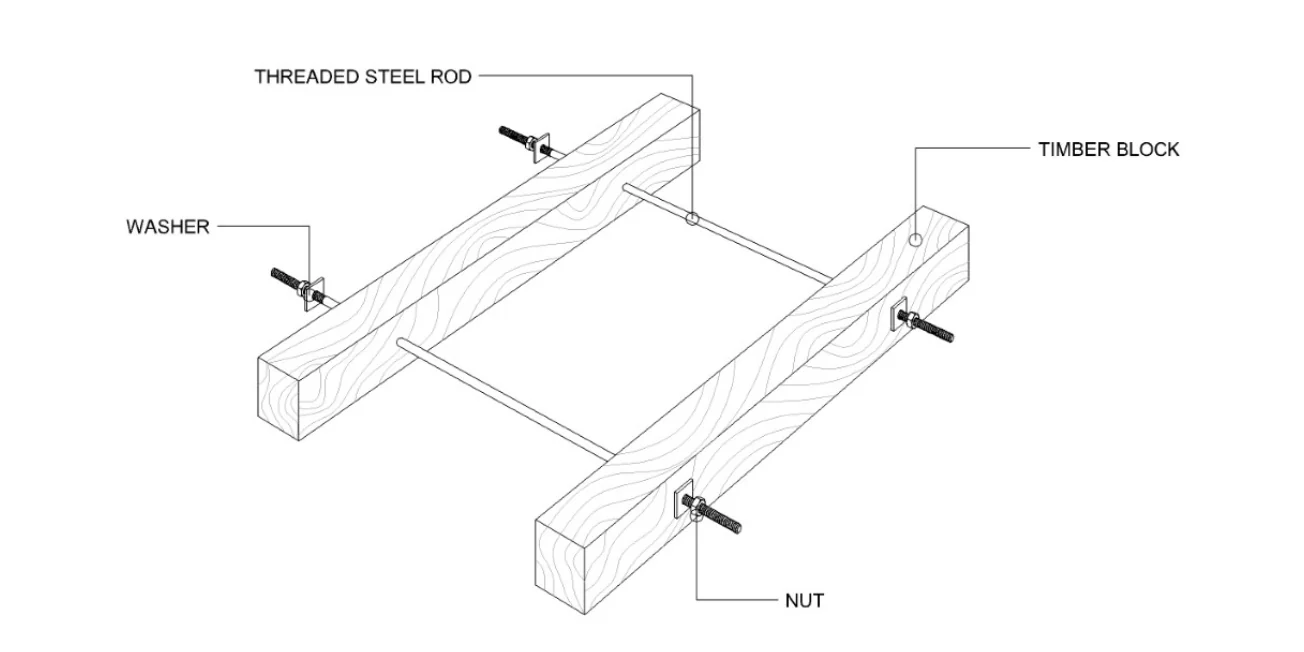
Friction Clamp
A simple device that can be made locally. Threaded rods and nuts tighten it around the pile at the chosen elevation. Plywood cut to the pile shape sits on top as a flat support for the jacket, and foam at the bottom of the annular space stops grout leaks.


Repair stops above the seabed?
Our team will recommend the right seal for your piles and provide specifications for your engineer.
Bottom Seal FAQs
Why does a PileMedic® jacket need a bottom seal?
The bottom of the annular space has to be closed before grouting so the grout stays in place. If the jacket reaches the seabed, embedding it 6 to 12 in. into the soil and placing a grout plug forms the seal. If it stops higher up, use a skirt and skirt pins, a ShearFlange™ or a friction clamp.
Why place a grout plug first?
A 6 to 12 in. (150 to 300 mm) layer of grout at the bottom, left to harden for several hours, seals the base. It keeps the weight of the remaining grout from blowing out the bottom or pushing soft soil aside. The installation guide recommends pouring the plug on day one and filling the rest the next day.
What if grout leaks from the base during the pour?
The foam and skirt were not installed correctly. For a slow leak, wait for the grout to set into a plug before filling the rest. For a fast leak, add foam at the bottom and a small amount of grout, and let it set before continuing.
Can the ShearFlange™ be reused?
Yes. It supports the jacket only until the grout hardens, then it is removed and used on the next pile. It is made for round piles.
What works on square or H-piles?
Skirt pins work on square piles, with slot 1 pins at the corners and slot 2 pins at the center of each face. A friction clamp works on any shape because its plywood platform is cut to match the pile.
PILEMEDIC® SYSTEM
More of the PileMedic® System
Planning a Submerged Pile Repair?
Tell us the pile type, repair height and water depth. Our team will recommend the right PileMedic® system and provide specifications for your engineer.